

Create A Bootable USB Drive By Simply Copying The ISO To The USB With Ventoy (Linux And Windows)

Ventoy is a fairly new open source tool to create bootable USB drives using Linux or Microsoft Windows ISO files. You install this tool to a USB drive, then simply copy some ISO files to the USB drive and you can boot from it with no other changes (so without having to reformat the USB drive every time you want to create a bootable USB drive, and without having to extract the ISO file contents).
The application is available for Microsoft Windows and Linux. It has a graphical user interface on Windows only; on Linux you'll need to use it from the command line.
When copying multiple ISO files to the USB drive, Ventoy provides a menu on boot from where you can choose which ISO to boot. You can even create a multiboot USB drive by adding ISO files for some Linux distributions and Windows ISO files on the same USB, as seen in the screenshot at the top of this page.
It's worth noting that you can continue to use the USB stick for other purposes. Once Ventoy is installed on an USB drive, that USB drive can be used to boot ISO files that you copy to it, but you can also copy other files to it, and that won't affect the operation of Ventoy.
To take advantage of the whole USB drive for other purposes, you don't have to format it. Delete all ISO files from it and use it as a regular USB drive (Ventoy only takes a few MB of space and is not visible when mounting the USB drive). When you want to use this same USB drive to boot an ISO, all you have to do is copy the ISO file (or multiple ISOs) to the USB and boot from it.
Ventoy comes with both legacy and UEFI Secure Boot support, and it has been tested with more than 260 ISO files, including Debian, Ubuntu (and its flavors), CentOS, RHEL, Deepin, Fedora, SLES, openSUSE, MX Linux, Manjaro, Linux Mint, Elementary OS, Pop!_OS, Solus OS, Zorin OS, Arch Linux, Puppy Linux, Tails, Slax, Kali Linux, Mageia, Slackware, Gentoo, NixOS, ALT Linux, KDE Neon, and many other Linux distributions, as well as Windows 7, Windows 8 / 8.1, Windows 10, and Windows Server 2012 / 2012 RS, 2016 and 2019.
Other Ventoy features:
- Persistence support for Ubuntu, MX Linux, Linux Mint, Elementary OS and Zorin OS
- Auto installation - this should work with Windows and any Linux distribution that support automatic installation, but it has only been tested with RHEL7/CentOS7/Fedora, Debian/Ubuntu Server and SUSE
- WIM files boot supported (Legacy + UEFI)
- Supports ISO files larger than 4 GB
- Upgrade the Ventoy installation on the USB drive without formatting the USB
Read on to see how to install Ventoy on an USB drive (from Microsoft Windows or Linux) and how to create a bootable USB drive with persistence using Ventoy.
Bootable USB drive-related:
Download and install Ventoy on an USB drive
The download button above links to Ventoy binaries for Microsoft Windows and Linux. If you wish to build it from source instead, see this page.
On Windows, Ventoy comes with a graphical user interface so using it is pretty straight-forward. To use it, extract the downloaded Ventoy .zip file, then launch the Ventoy2Disk executable.
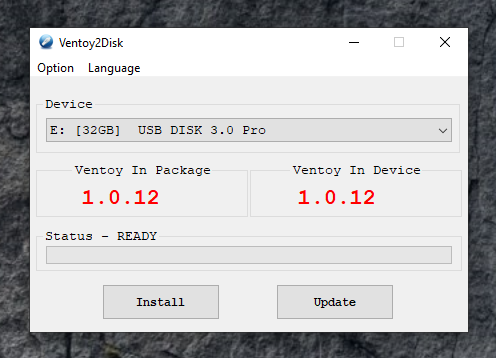
Choose the USB drive from the Device list, optionally enable Secure Boot support (from the menu), then click the button to install Ventoy to the USB stick. Now that Ventoy is installed on your USB drive, you can create a bootable USB drive by simply copying some ISO files onto the USB, no matter if they are Linux distribution ISOs or Windows 10 / 8 / 7 ISO files.
On Linux, extract the Ventoy .tar.gz file and you'll find 3 folders as well as 2 scripts, Ventoy2Disk.sh for installing Ventoy on an USB drive, and CreatePersistentImg.sh for creating a persistent image to use with Ventoy.
But before installing Ventoy on an USB drive and creating a bootable USB drive, you need to find out the device name of this USB drive, and unmount it if it's mounted. Follow the steps below to do this, and then install Ventoy on an USB drive on Linux.
1. Find out the USB drive device name and available partitions
Plug-in the USB into your computer, then run the following command (you can also use or instead; or use Gparted if you prefer a GUI) in a terminal:
This should output the disks and partitions attached to your computer, including the USB drive. You'll need to figure out which one of the devices listed is your USB drive, based on the model name, disk size, etc.
Example with the command showing an USB drive attached to my computer:
In this example output you can find the USB device name by looking under Disk, so in my case, it's .
The partitions are listed below the Disk Flags, so in this example there are 2 partitions: 1 and 2 (since the device name is , the partitions are and ).
2. Unmount any mounted USB drive partitions
In case the USB drive has mounted partitions, unmount them before proceeding (or else you won't be able to install Ventoy on the USB, and this is required for creating a bootable USB drive) by opening a terminal and using this command:
Replace with the USB device partitions. Make sure to unmount all mounted disk partitions.
In my example, the USB drive device name is , and its partitions are and , so in that case the commands to unmount them would be:
3. Install Ventoy on the USB disk
It's important to note that all the data on the disk where you install Ventoy will be lost! Make sure the USB device name is correct so you don't accidentally lose the data from a hard drive.
To be able to create bootable USB drives by simply copying the ISO files onto the USB, you'll need to install Ventoy on the USB drive. Open a terminal and navigate to the folder where you've extracted Ventoy (the folder which contains the script).
Then to install Ventoy on the USB disk without Secure Boot support, use:
Or, to install Ventoy on the USB disk with Secure Boot support, use:
In both of these commands you need to replace with the USB device name that you found out in step 1.
You will be asked to confirm if USB device name is correct twice - type and press the key to continue.
Example:
Now that Ventoy is installed on your USB drive, you can create a bootable USB drive by simply copying some ISO files onto the USB, no matter if they are Linux distribution ISOs or Windows 10 / 8 / 7 ISO files.
Boot from this USB drive and you'll see a list of ISO files that are available on it - click any of them and you'll boot the selected ISO file with the possibility of installing the Linux distribution or Windows version you've copied to the USB drive.
How to create a bootable USB drive with persistence using Ventoy
When you create a regular Linux live USB, you can install software, download files, make changes to the system, and so on, but all of these changes are lost after a reboot. A persistent live USB allows saving any changes you make to the live system, so they are still present the next time you boot to it.
Ventoy supports creating bootable USB drive with persistence support. Among the Linux distributions for which Ventoy supports persistence are Ubuntu, MX Linux, Linux Mint, Elementary OS and Zorin OS, although more probably work, but haven't been tested. Generally, any Linux distribution based on Ubuntu should work.
The following instructions assume you've already downloaded, extracted and installed Ventoy on an USB device (see the instructions above). It's worth noting that this requires the CreatePersistentImg.sh script, only available with the Ventoy Linux download (there's no similar solution available with Ventoy for Windows).
1. Create a persistent image file
To create a persistent bootable USB drive, the first step is to create the backend image file. This is a simple disk image with a label. You can use the script, available in the folder where you've extracted Ventoy for Linux, to create this image file.
Open a terminal, navigate to the folder where you've extracted Ventoy (which should contain the CreatePersistentImg.sh script), and run this command to create an image file with the size of 4 GB:
This creates a 4 GB EXT4 image file with a default label of casper-rw. 4096 represents the size of the image file in MB, if you want to increase or descrease the size, change this number.
You can see all the available options by running:
2. Copy the persistent image file to the USB drive
The created image file is called , and it should be available in the Ventoy folder (next to the script). Plug-in the USB stick on which you've installed Ventoy, and copy this file to the USB drive.
[[Edit]] The persistance file was initially called "persistance.img", but it was renamed to "persistence.dat" recently. That's why in the screenshot further down this port, you'll see that the option is called "Boot with /persistance.img", instead of "Boot with /persistance.dat".
3. Create a Ventoy json configuration file containing the paths to the ISO and persistence files
On the USB drive on which you've installed Ventoy, create a folder called . Inside this folder create a file called , and open this file with a text editor.
Inside the file, paste this:
Replace with the ISO filename (and path if it's not in the root of the USB), and with the persistence image filename and path (in case you've changed the name and didn't place it in the root of the USB).
For example, if you have an ISO called and a persistence image file called , both placed in the root of the USB drive (in the lowest-level directory, the one that opens when you click on the USB drive icon), the file would look like this:
You can add multiple ISO files with persistence if you wish, for example:
Make sure the paths and syntax are 100% correct. If you miss (or have an extra) comma for example, or if the paths are not correct, the persistence won't work.
For more on this, see the Ventoy persistence documentation.
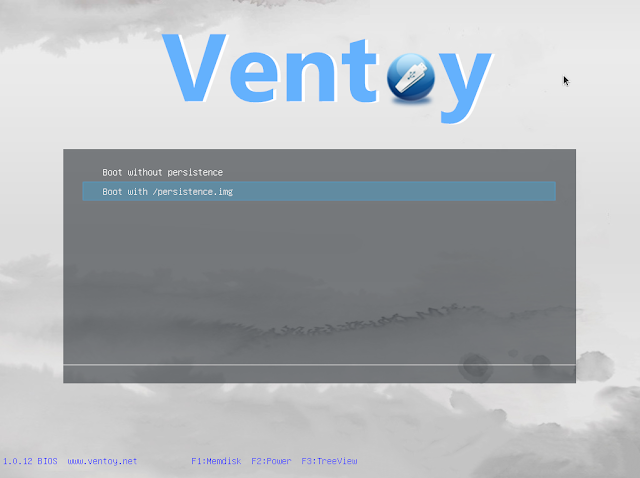
When you're done, save the file and boot from this USB drive. After clicking on the ISO for which you've added persistence, you'll see a menu that lets you boot with or without persistence, like shown in the screenshot above.
h/t: conductor on HN
3. Create a Ventoy json configuration file containing the paths to the ISO and persistence files
On the USB drive on which you've installed Ventoy, create a folder called . Inside this folder create a file called , and open this file with a text editor.
Inside the file, paste this:
Replace with the ISO filename (and path if it's not in the root of the USB), and with the persistence image filename and path (in case you've changed the name and didn't place it in the root of the USB).
For example, if you have an ISO called and a persistence image file called , both placed in the root of the USB drive (in the lowest-level directory, the one that opens when you click on the USB drive icon), the file would look like this:
You can add multiple ISO files with persistence if you wish, for example:
Make sure the paths and syntax are 100% correct. If you miss (or have an extra) comma for example, or if the paths are not correct, the persistence won't work.
For more on this, see the Ventoy persistence documentation.
When you're done, save the file and boot from this USB drive. After clicking on the ISO for which you've added persistence, you'll see a menu that lets you boot with or without persistence, like shown in the screenshot above.
h/t: conductor on HN

0 thoughts to “Linux download a live iso to another partition”