

How to stop Windows 10 and other programs from doing background uploads and downloads while cruising
A friend of ours uses a Satellite phone for connecting to the Internet while cruising. He was going nuts because his data download bills were insanely high even when he was just doing a couple of emails.
He KNEW something was uploading and downloading in the background but could not discover what it was or how to stop it. This can also be a major pain with data connections using mobile phones, especially when cruising in a foreign country.
The first suspect is, of course, Windows 10 which does background uploads and downloads without letting the user know. Windows 10 is especially difficult because Microsoft won't let you turn off automatic windows updates.
The second suspect is the computer maker. Lenovo (which my friend was using) is notorious for installing spyware that uploads and downloads information without the user knowing about it. Dell does it too, but not to the same extent.
The third suspect is Chrome and/or Firefox.
To know for sure set up this easy, free, network monitor so you can keep track of what programs are uploading or downloading in the background.
So how do you stop what's eating your mobile data?
Wow! Just discovered this GREAT little free program called ShutUp10 to control Windows 10 data uploading and downloading. It puts all the Windows 10 permissions in one easy to access interface and you can't even imagine how much stuff is being sent to and from Microsoft. Check it out here
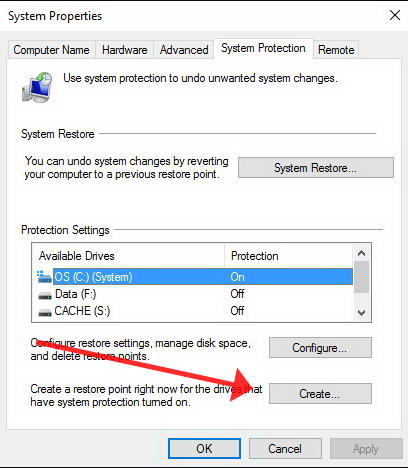
#1 - CRITICAL - make a restore point so you can undo any changes that mess up your system.
Click on the start button or the magnifying glass icon and enter Restore Point - click on the Create a Restore Point link in the list that shows up.
When the window below opens, click on the create button, enter a name for the restore point, and save it.
Windows 10
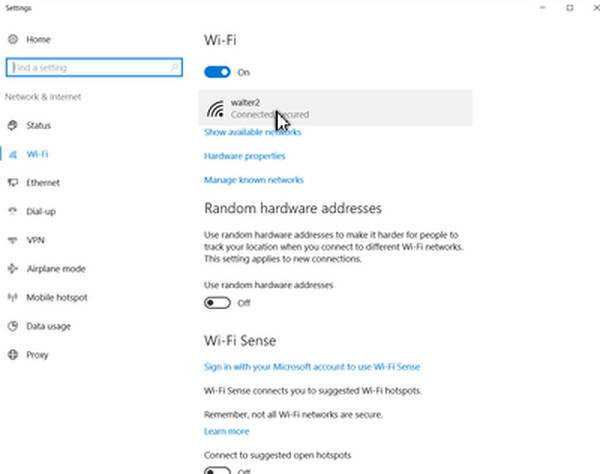
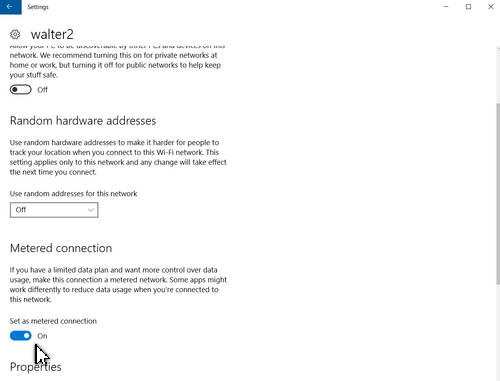
Windows 10 will let you set your WiFi connection to "metered" and won't (in theory) download gigabytes of updates if you are using a metered connection - like using your mobile phone wifi hotspot or your satellite phone connection.
Click in the magnifying icon on the task bar or click on the start button and type METERED into the window. The settings for adjusting your WiFi connection appears.
That takes care of Windows auto-updates but there may be other sneaky apps that will update in the background.
Here's what you need to do. Click on the little magnifying icon on the task bar - or click on the start button - and type SETTINGS into the window.
When the settings window opens click on the Privacy Icon
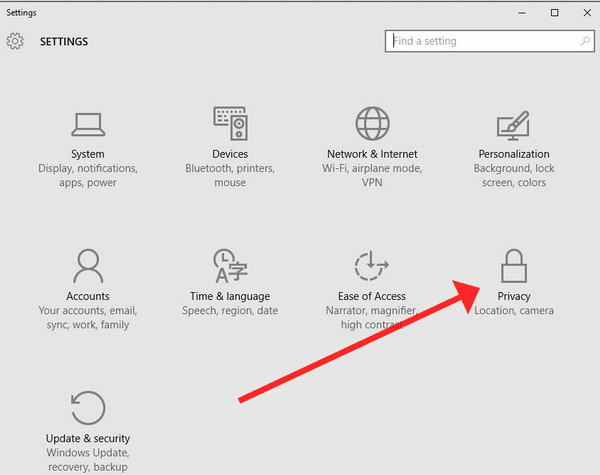
Now go down the list of items in the left menu bar and in the right column, turn off anything you don't want sneaking uploads and downloads in the background.
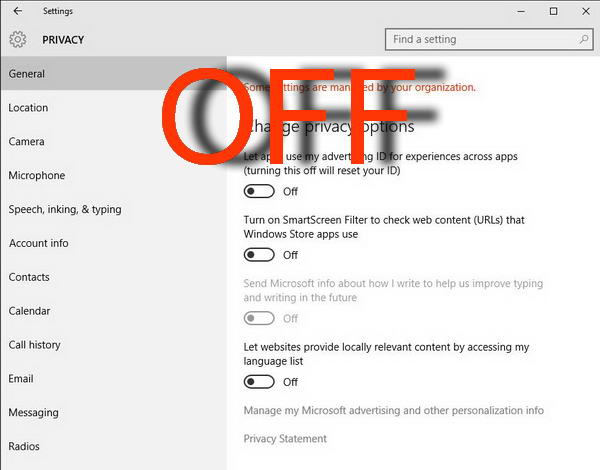
You'll be floored when you see what little data sucking creatures are hiding on your computer; especially if you have a Lenovo.
We now go to the Schedule Tasks window where your computer releases those data parasites into the wild.
To open the schedule tasks window, Click the lower-left Start button or the magnifying glass icon and, enter schedule in the empty box and select Schedule tasks from the results.
When the Schedule Tasks Window opens click on a folder icon in the Task Scheduler (local) menu. this will reveal Named actions scheduled to deploy in the background.
Click on a named action in the center column and in the right hand menu click "disable" - You could delete some actions - like sending customer satisfaction information to Lenovo - but it might not be a good idea to delete some of the actions under the Windows list. Disabling an action will let you come back and enable it again if your computer freaks out. Don't go wild here, just get rid of marketing ploys like Customer Experience Programs etc.
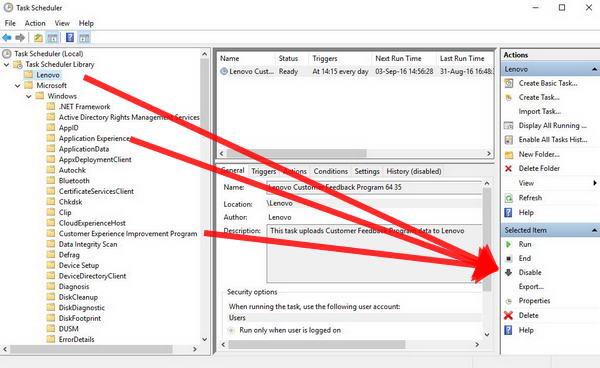
I disabled the following actions in the Microsoft Tasks:
- Customer Experience Improvement Program (disable all 4 actions)
- Windows Error Reporting
- Windows Update (Not needed if you have used the Configure Auto Update tool above - If you didn't use that tool you can disable the first 6 named actions, leave sihboot enabled. ) - you will need to enable these again when you are using a normal Internet connection and want to download updates again.
There's MORE Data parasites lurking on some computers.
Lenovo's Superfish scandal reveals that some hidden software uploads information about your computer activities without you knowing about it and displaying advertisements in your browsers (with you paying for the advertisements in data-use).
Dumping the Superfish:
Open the Windows Control Panel, select Programs and click Uninstall a Program. Search the list for VisualDiscovery. If it is there, click the program and select Uninstall. If it WAS there, you'll need to go one step further and uninstall hidden certificates for Superfish.
Click on the Windows Start button and enter certmgr.msc in the search box. Launch the certmgr.msc program, click on Trusted Root Certification Authorities, followed by Certificates. Search through the certificates for anything mentioning Superfish Inc. Once you have found the certificates, right-click them and select Delete.
Click on the Chrome menu (or press Alt+E) Select Settings. Click on the link titled 'Show advanced settings' Under the section headed 'System' untick the box next to "Continue running background apps when Google Chrome is closed"
Both Firefox and Chrome will update to the latest version in the background without telling you, munching happily on your mobile or satellite data use.
Older versions of these browsers let you turn this auto-update off. No Longer. To protect you from cyber nuts and their own incompetence in making an unsecured software system, the auto-update is now a bit of a challenge to turn off. Here's how to do it:
Note: This also turns off auto-updates for other Google apps on your computer - like Google Earth.
For Chrome, Click on the start button or the magnifying glass icon and enter msconfig in the box and hit enter. It will open the System Configuration Window.
In the System Configuration window, click the Services tab. At the bottom, check the box "Hide All Microsoft Services". This will hide all the services related to Microsoft so that you don't disable essential services. Under services section search and find Google Update (gupdate) and Google Update (gupdatem).
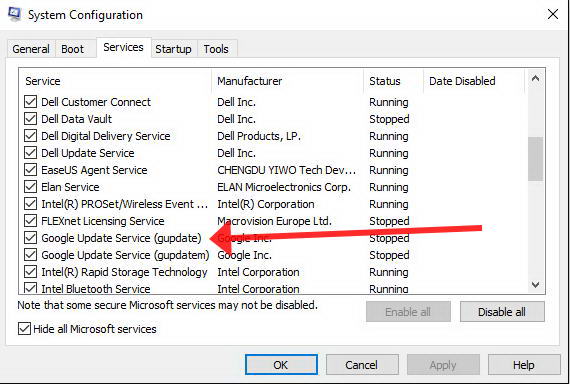
Uncheck both the?Google Services?and click the?Apply?button. Click?OK?to save the settings.
You can also uncheck any other service that is eating data in the background (like Dell Customer Connect, Dell Digital Delivery Service, Dell Update Service)
Firefox at least will let you set up the browser to notify you when an update is available, but won't download it and install it untill you say it's OK.
Click on the menu icon in the top right of the tool bar and select Options. Then click on Advanced and select "Never Check for Updates" or "Check for updates, but let me choose whether to install them".
You DO really need to update your browsers and Windows OS when you return to a port and have a good WiFi or land-line Internet connection.
Bookmark this page so you can return here and reverse what you have just done when you are ready to update your system again. :-)

-
-
-